No matter what material you cover your roof with, you will still need to source sheet metal to carry out the necessary treatment of the various elements. This will ensure that the structure is adequately protected against moisture and mechanical damage. Find out how to do roof flashing correctly!
Roof flashing – what does it consist of?
Roof flashing is the process of making and installing flashing elements to reinforce and protect the roof slope, chimney, valley or gutters. Properly executed flashing translates into roof protection, roof tightness and proper drainage of water from the roof surface. The process involves the exact fabrication of the sheet metal components, cutting them to size and then assembling them using special tools and materials. All elements should be carefully sealed to ensure maximum protection from water and snow.
Roof flashing requires specialist knowledge and skills, so it is worth commissioning an experienced professional. Correctly executed roof flashing ensures a long service life of the structure and roofing without the need for amendments and repairs. However, if you decide to do it yourself, you will need to stock up on the necessary accessories.
Flashing materials
Various materials are used for flashing. Which are the most popular?
- Galvanised or coated steel sheet – this is the most commonly used material in sheet metal work. It is durable, corrosion-resistant and easy to work with.
- Aluminium sheet – is lightweight, durable and corrosion-resistant, making it the ideal material for roof flashing.
- Copper – is a more expensive material than steel and aluminium, but has an exceptionally high corrosion resistance due to the patina that spontaneously forms on its surface. In addition, copper stands out for its aesthetic qualities due to its characteristic colour.
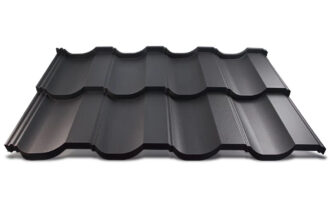
- Coated sheets – available in a variety of colours, they are ideal for decorative flashings such as canopies over windows or decorative eaves.
- Gaskets and adhesives – these are materials that are used to ensure the tightness of joints between roof flashings as well as also in the treatment of chimneys.
The choice of a particular material depends on your preferences, budget and the characteristics of the roof and weather conditions in your region. A good roof flashing expert will certainly help you choose the right materials.
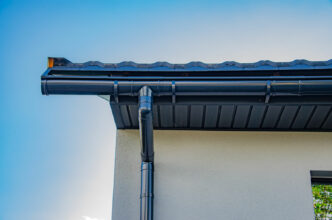
Eaves flashing
The eaves are an important part of the roof, serving to drain water from the roof surface and protect the walls of the building from dampness. What steps should be taken when flashing the eaves?
- Preparation of tools and materials – prepare suitable tools and materials such as:
- sheet metal shears,
- hammer,
- screwdriver,
- measuring tape,
- sheet metal,
- screws,
- gaskets and adhesives.
- Preparing the work area – before you start processing, properly secure the work area to avoid Protect yourself too with appropriate protective equipment such as a helmet, gloves and shoes with non-slip soles.
- Cutting the sheet to the correct dimensions – measure the dimensions of the eaves accurately and cut the sheet to the correct size. Remember that the sheet should be cut with an allowance so that it can be shaped and bent properly.
- Installation of ridge and gutter strip.
The undergutter belt is an element of flashing placed on the wooden structure of the same name. It is used to seal the connection between the gutters and the roofing and to protect the roof structure from water. The gutter strips are usually made of sheet metal of the same thickness and colour as the roofing and installed with FARMER screws together with the gutter brackets.
The gutter band is an element of the flashing which is intended to prevent the entry of rainwater between the gutters and the gutter band. The gutter belt is usually made and installed so that its lower part “enters” the gutter to a depth of approx. 3cm as close as possible to the inner edge of the gutter and the upper part is screwed with FARMER screws to the first (lower) batten of the roof structure.
Both the gutter belt and the under-gutter belt are intended to provide protection to the roof structure and façade from moisture, which can cause damage and adversely affect the aesthetics of the building.
- Sheet bending – after installation the sheet metal should be bent in a suitable way to ensure the tightness of the eaves and the adhesion to the building façade.the façade of the building.
- Sealing the joints – finally, you need to seal all the joints. Use special gaskets and adhesives for this purpose.
Eaves flashing is a complex process and requires specialised knowledge and skills. With this in mind, it is best to have it carried out by an experienced professional who will carry out all the work precisely.
Roof valley flashing
The roof basket is a place where two roof slopes connect on different planes and at the same time it is the area exposed to the greatest water and snow load. The basket is usually finished with a metal sheet that acts as a shallow gutter. The structure is based on compacted battens or special boards laid along the valley rafters.
When flashing the roof valley, lay the sheet from the bottom towards the ridge and remember to maintain a minimum 20 cm overlap. In this case, the sheet must not be nailed or screwed, as the material should be intact. Instead, attach it to the grate with small plates called frogs. Place a strip of roofing membrane on the formwork and make sure that the membrane laid overlaps the strip.
Chimney flashing
The passage of the chimney through the roof is an extremely sensitive location. It is in this area that leaks often occur, jeopardising the safety of the entire roof structure. The chimney treatment consists of two key elements.
Bend the edge of the top flashing and place it in the notch made in the chimney. Afterwards, the joint between the sheet metal and the chimney is additionally protected with roofing sealant. This should be done before the roofing is installed.
Also remember to treat the bottom section of the chimney. In this case, you need to make a flashing strip that connects to the slope rather than to the chimney itself. The belt should be tucked under the top of the treatment. Double protection will ensure that the chimney and slope work independently. In this case, too, it is worth entrusting the flashing to qualified specialists.